3 Data wrangling basics
3.1 Outline / cheat sheet
- Reducing data dimensionality:
select: Name the columns to keep, separated by a comma. Using select will reduce the number of columns in your data framefilter: Set conditions by which you want to filter (keep) some of the data. Using the filter function will reduce the number of rows in your data frameis.na(): Specify a column name to get a logical vector indicated whether each value in that row has an NA value. Useful when paired with filter.
- Combining multiple steps
%>%: Link together multiple steps by ‘piping’ the output of one line of code into the next
- Creating new variables
- New columns
mutate: Create a new column by assigning a value (transformed or otherwise)case_when: Pair withmutateto create a new variable that is based on one or more conditions, typically for creating categorical variables
- Summary tables
group_by: Set a column (or columns) by which you want to perform a summarizing function on. Using this function does apparently nothing on its own, but is powerful when paired withsummarizeormutatesummarize: Create a new variable by performing a variety of summary/transformative functions on an existing column (or set of columns). When paired withgroup_by, data is reduced to a summary table
- New columns
3.2 Reducing data dimensionality
The functions, select and filter, are what you can use to reduce dimensionality of your data frame. That means reducing the number of column (with select) and/or the number of rows (with filter). To use select, name the columns to keep, separated by a comma. For example, let’s select the species, year, sex, and body mass columns.
## [1] "species"           "island"            "bill_length_mm"
## [4] "bill_depth_mm"     "flipper_length_mm" "body_mass_g"
## [7] "sex"               "year"
# select species, year, sex, and body mass
penguins_selected <- select(penguins, species, year, sex, body_mass_g)
# Take a look at the 'dimensions' with dim()
dim(penguins_selected)## [1] 344 4The select columns can also be used to remove columns rather than select by using the - operator. For example, we may want to remove only two columns, island and year:
# Un-select the island and year columns by using -.
penguins_unselected <- select(penguins, -island, -year)
# Take a look at the 'dimensions' with dim()
dim(penguins_unselected)
## [1] 344 6Now, let’s filter the data based on a certain condition. Creating ‘conditions’ in R means writing logical statements with a response that will be either TRUE or FALSE. To write conditions we can use comparative operators, which give a logical output:
| Comparative Operator | Name | Example |
|---|---|---|
| == | Equal | x == y |
| != | Not equal | x != y |
| > | Greater than | x > y |
| < | Less than | x < y |
| >= | Greater than or equal to | x >= y |
| <= | Less than or equal to | x <= y |
##  [1]  TRUE  TRUE  TRUE  TRUE  TRUE  TRUE  TRUE  TRUE  TRUE  TRUE  TRUE  TRUE
## [13]  TRUE  TRUE  TRUE  TRUE  TRUE  TRUE  TRUE  TRUE  TRUE  TRUE  TRUE  TRUE
## [25]  TRUE  TRUE  TRUE  TRUE  TRUE  TRUE  TRUE  TRUE  TRUE  TRUE  TRUE  TRUE
## [37]  TRUE  TRUE  TRUE  TRUE  TRUE  TRUE  TRUE  TRUE  TRUE  TRUE  TRUE  TRUE
## [49]  TRUE  TRUE FALSE FALSE FALSE FALSE FALSE FALSE FALSE FALSE FALSE FALSE
## [61] FALSE FALSE FALSE FALSE FALSE FALSE FALSE FALSE FALSE FALSE FALSE FALSE
## [73] FALSE FALSE FALSE
The filter function evaluates the condition and keeps only the rows for which the value is TRUE. For example, let’s filter observations so that we only keep those from the year 2007.
## [1] 110 8There are other functions we can use to evaluate columns and get a T/F output. An important one is is.na(). This function evaluates a column and reports back a TRUE value when there is an NA in that column’s row. For example, we can use the head() function to look at the top 6 values of the sex column, and see that there is an NA in the fourth row.
##  [1] male   female female <NA>   female male   female male   <NA>   <NA>
## [11] <NA>   <NA>   female male   male   female female male   female male
## [21] female male   female male   male   female male   female female male
## [31] female male   female male   female male   male   female female male
## [41] female male   female male   female male   male   <NA>   female male
## [51] female male   female male   female male   female male   female male
## [61] female male   female male   female male   female male   female male
## [71] female male   female male   female
## Levels: female male
The is.na function evaluates the whole column and gives us TRUES whenever it sees an NA. Not surprisingly, we see a TRUE in the fourth observation.
##  [1] FALSE FALSE FALSE  TRUE FALSE FALSE FALSE FALSE  TRUE  TRUE  TRUE  TRUE
## [13] FALSE FALSE FALSE FALSE FALSE FALSE FALSE FALSE FALSE FALSE FALSE FALSE
## [25] FALSE FALSE FALSE FALSE FALSE FALSE FALSE FALSE FALSE FALSE FALSE FALSE
## [37] FALSE FALSE FALSE FALSE FALSE FALSE FALSE FALSE FALSE FALSE FALSE  TRUE
## [49] FALSE FALSE FALSE FALSE FALSE FALSE FALSE FALSE FALSE FALSE FALSE FALSE
## [61] FALSE FALSE FALSE FALSE FALSE FALSE FALSE FALSE FALSE FALSE FALSE FALSE
## [73] FALSE FALSE FALSE
Since is.na() gives us a T/F vector, it is already a good candidate for using it as a condition in filter. Below we are asking the filter function to keep only the observations that have an NA in the sex column. In other others, evaluate the logical conditions “are there NAs in the sex column?” then filter out the rows where the condition is TRUE, meaning there are NAs.
## [1] 11 8To do the reverse, i.e. keep only the observations that do NOT have an NA in the sex column, we can use the ! sign to denote ‘not’ and reverse the T/F.
## [1] 333 8You can combined multiple conditions using logical operators:
| Logical Operator | Name | Example |
|---|---|---|
| & | AND | x == 2 & y == 10 |
| | | OR | x == 2 | y == 10 |
For example, we can filter out the rows where there are NAs in the sex column AND keep only the rows of the penguin species named Adelie.
penguins_filtered_2conditions <- filter(penguins, !is.na(sex) &
                                          species == "Adelie")
dim(penguins_filtered_2conditions)
## [1] 146 83.3 Combining multiple steps
There are several ways to combine steps in coding. You can perform one function at a time and save intermediate objects as you work, you can ‘nest’ functions, or you can use ‘pipes’ (%>%). So for example, if you wanted to select the species, sex, bill length, and bill depth, and filter data so to only keep data ‘Adelie’ penguins, with no NAs in the sex column, these first two options would look as follows:
# Multiple steps with intermediate objects
penguins_step1 <- select(penguins, species, sex, bill_length_mm, bill_depth_mm)
penguins_step2 <- filter(penguins_step1, species == 'Adelie' & !is.na(sex))
summary(penguins_step2)
## species sex bill_length_mm bill_depth_mm
## Adelie :146 female:73 Min. :32.10 Min. :15.50
## Chinstrap: 0 male :73 1st Qu.:36.73 1st Qu.:17.50
## Gentoo : 0 Median :38.85 Median :18.40
## Mean :38.82 Mean :18.35
## 3rd Qu.:40.77 3rd Qu.:19.00
## Max. :46.00 Max. :21.50# Multiple steps with nested functions
penguins_nested <- filter(select(penguins, species, sex, bill_length_mm, bill_depth_mm),
species == 'Adelie' & !is.na(sex))
summary(penguins_nested)## species sex bill_length_mm bill_depth_mm
## Adelie :146 female:73 Min. :32.10 Min. :15.50
## Chinstrap: 0 male :73 1st Qu.:36.73 1st Qu.:17.50
## Gentoo : 0 Median :38.85 Median :18.40
## Mean :38.82 Mean :18.35
## 3rd Qu.:40.77 3rd Qu.:19.00
## Max. :46.00 Max. :21.50The third option is pipes. Pipes let you take the output of one function and send it directly to the next, which is useful when you need to do many things to the same data set. Pipes in R look like %>% and are made available via the magrittr package, installed automatically with the tidyverse. If you use RStudio, you can type the pipe with Ctrl + Shift + M if you have a PC or Cmd + Shift + M if you have a Mac.
# Multiple steps with pipes
penguins_piped <- penguins %>%
  select(species, sex, bill_length_mm, bill_depth_mm) %>%
  filter(species == 'Adelie' & !is.na(sex))
summary(penguins_piped)
## species sex bill_length_mm bill_depth_mm
## Adelie :146 female:73 Min. :32.10 Min. :15.50
## Chinstrap: 0 male :73 1st Qu.:36.73 1st Qu.:17.50
## Gentoo : 0 Median :38.85 Median :18.40
## Mean :38.82 Mean :18.35
## 3rd Qu.:40.77 3rd Qu.:19.00
## Max. :46.00 Max. :21.50We will use the piping approach, as it helps make a smoother workflow for other wrangling functions we’ll use.
3.3.1 Check in challenge
Use pipes to select only the columns for species, sex, bill_length_mm, and body_mass_g, and filter out where sex is missing and body_mass_g is greater than 3500. Name this new data frame ‘filter_challenge’ and look at a summary of it to check your work.
Check your answer
filter_challenge <- penguins %>%
  select(species, sex, bill_length_mm, body_mass_g) %>%
  filter(is.na(sex) & body_mass_g > 3500)
str(filter_challenge)
## tibble [6 × 4] (S3: tbl_df/tbl/data.frame)
## $ species : Factor w/ 3 levels "Adelie","Chinstrap",..: 1 1 3 3 3 3
## $ sex : Factor w/ 2 levels "female","male": NA NA NA NA NA NA
## $ bill_length_mm: num [1:6] 42 37.8 44.5 46.2 47.3 44.5
## $ body_mass_g : int [1:6] 4250 3700 4100 4650 4725 48753.4 Creating new variables
3.4.1 New columns
We may often want to make a new column with some updated or transformed value. We can use the mutate function for this, in which you can assign the new column name and its value. The idea is generally mutate(data, new_column_name = value). For example, if we wanted to calculate a new value, the ratio of bill length to bill depth, we could do the following
# Mutate to create a new column; use penguins_piped so our output is
# easier to view
mutate(penguins_piped, bill_ratio = bill_length_mm / bill_depth_mm)
## # A tibble: 146 × 5
## species sex bill_length_mm bill_depth_mm bill_ratio
## <fct> <fct> <dbl> <dbl> <dbl>
## 1 Adelie male 39.1 18.7 2.09
## 2 Adelie female 39.5 17.4 2.27
## 3 Adelie female 40.3 18 2.24
## 4 Adelie female 36.7 19.3 1.90
## 5 Adelie male 39.3 20.6 1.91
## 6 Adelie female 38.9 17.8 2.19
## 7 Adelie male 39.2 19.6 2
## 8 Adelie female 41.1 17.6 2.34
## 9 Adelie male 38.6 21.2 1.82
## 10 Adelie male 34.6 21.1 1.64
## # ℹ 136 more rowsNote that in order to save the column in the data frame, we must assign it as a new data frame object. The output of mutate is not just a new column on its own, but the whole data frame with the new column appended. So far we have not overwritten in, and we can see that bill_depth_cm is not in our penguins data frame
## [1] "species" "sex" "bill_length_mm" "bill_depth_mm"Only once we assign it do we have a data frame now with the new column appended
penguins_newcolumn <- mutate(penguins_piped, bill_ratio = bill_length_mm / bill_depth_mm)
colnames(penguins_newcolumn)
## [1] "species" "sex" "bill_length_mm" "bill_depth_mm"
## [5] "bill_ratio"In addition to the mathematical transformations we just tried, we may want to create new, discrete categories with our data. For example, let’s categorize bill ratio into discrete size groups based on its distribution.
##    Min. 1st Qu.  Median    Mean 3rd Qu.    Max.
##   1.640   2.013   2.138   2.121   2.239   2.450
All values are greater than 1, so all bill lengths are greater than depths. Still, lower ratio values mean that the bill depth is large relative to its length (deep bills) and higher values mean that bill depth is small relative to its length (shallow bills). Let’s say we wanted to use these bill ratios to group penguins into one of three groups: ‘deep’ ‘average’ and ‘shallow’.
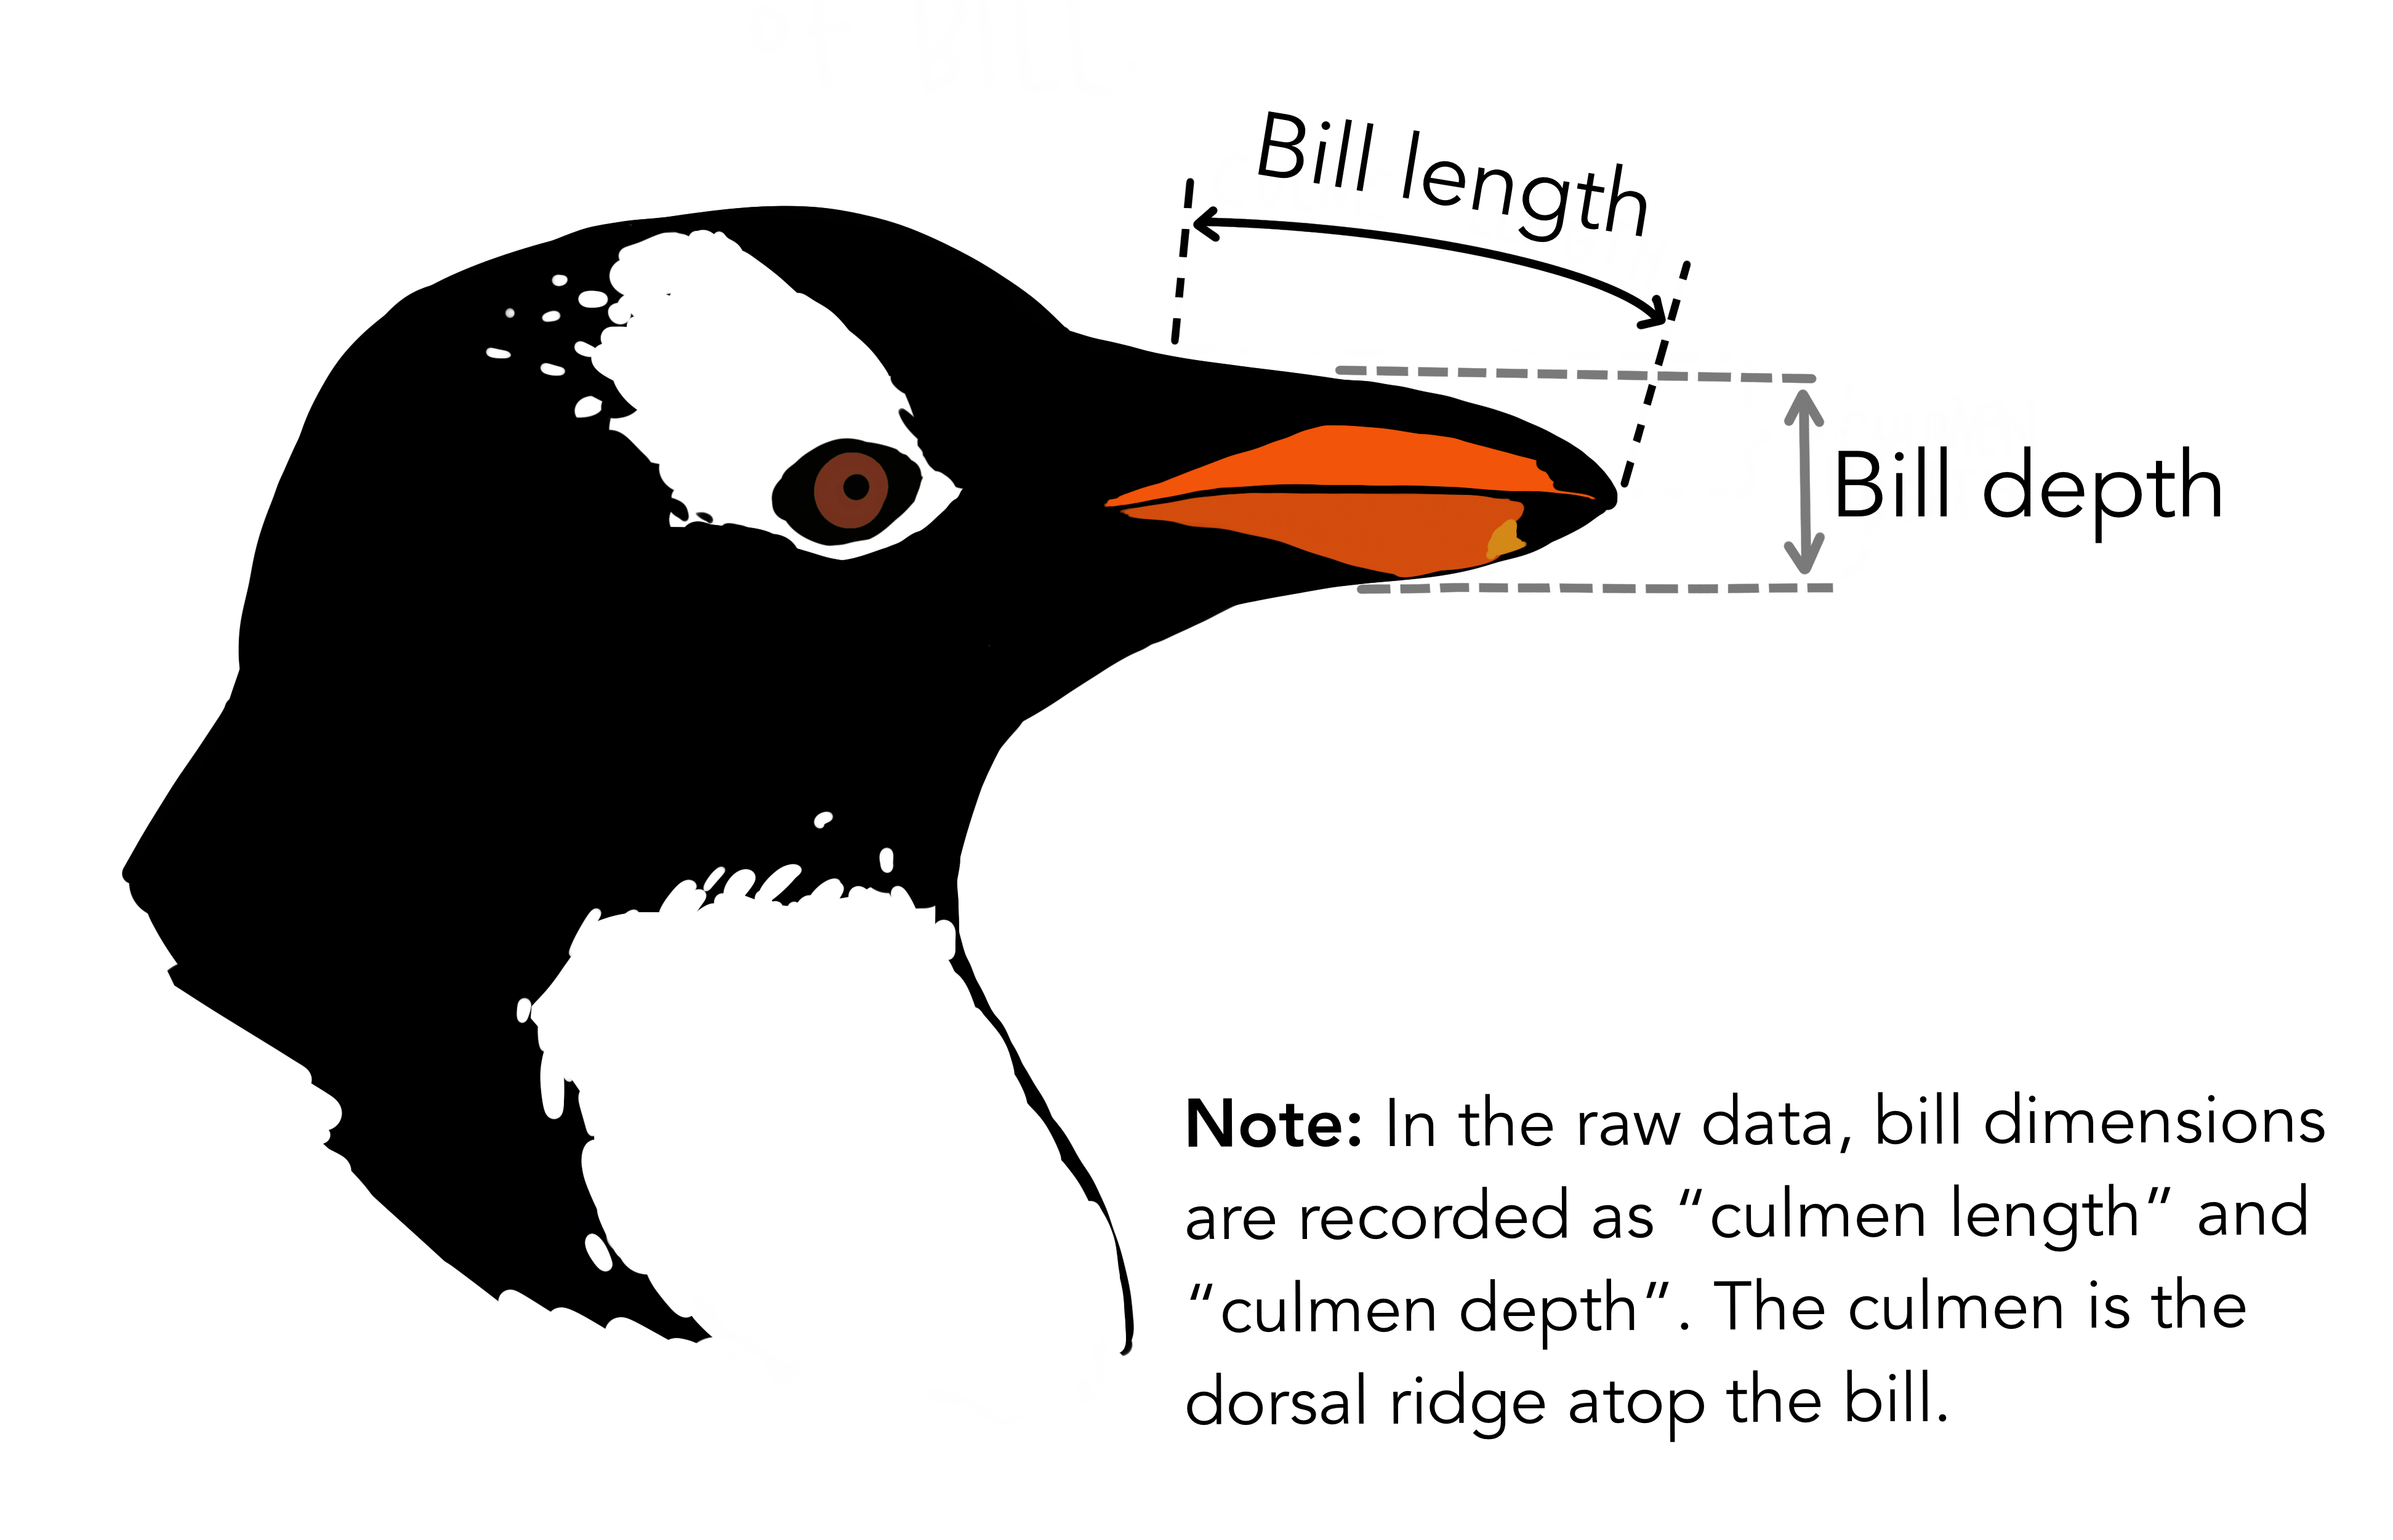
Figure 3.1: Artwork by @allison_horst
The case_when function, combined with mutate, lets us set multiple conditions and assign resulting categories. This function uses a series of two-sided formulas where the left-hand side determines describes the condition, and the right supplies the result. The final condition should always be TRUE, meaning that when the previous conditions have not been met, assign the last value.
Using these functions we can create a depth ratio category variable:
penguins_newcolumn <- penguins_newcolumn %>%
  mutate(bill_depth_cat = case_when(
    # Using the 1st Q as cutoff
    bill_ratio <= 2.013 ~ 'deep',
    # Between 1st and 2rd Q
    bill_ratio > 2.013 & bill_ratio <= 2.239 ~ 'average',
    T ~ 'shallow'
  ))

head(penguins_newcolumn$bill_depth_cat, n = 75)
## [1] "average" "shallow" "average" "deep" "deep" "average" "deep"
## [8] "shallow" "deep" "deep" "average" "average" "average" "deep"
## [15] "average" "average" "average" "deep" "average" "shallow" "deep"
## [22] "average" "shallow" "average" "average" "shallow" "average" "average"
## [29] "average" "average" "deep" "deep" "shallow" "deep" "average"
## [36] "average" "average" "deep" "average" "average" "average" "average"
## [43] "deep" "deep" "average" "average" "deep" "average" "deep"
## [50] "average" "average" "average" "average" "deep" "average" "deep"
## [57] "average" "shallow" "average" "shallow" "average" "average" "average"
## [64] "average" "deep" "average" "shallow" "shallow" "average" "shallow"
## [71] "shallow" "deep" "shallow" "average" "deep"A note: Always be cautious about what might be left out when naming the conditions. In the previous example, we assume that everything left after the first two conditions would be shallow. To be on the safe side, I often set every condition and leave the last condition either an error notice, or NA, so that I can check my conditions.
penguins_newcolumn <- penguins_newcolumn %>%
  mutate(bill_depth_cat = case_when(
    # Using the 1st Q as cutoff
    bill_ratio <= 2.013 ~ 'deep',
    # Between 1st and 2rd Q
    bill_ratio > 2.013 & bill_ratio <= 2.239 ~ 'average',
    bill_ratio >= 2.239 ~ 'shallow',
    T ~ 'ERROR'
  ))
Then we can use the unique function to look at all of the unique values of that new variable to check out work.
## [1] "average" "shallow" "deep"3.4.2 Summary tables
Often we want to aggregate data at certain levels to better understand differences across groups. For instance, does flipper length differ by species? Does body mass change between years? We can combine the group_by and summarize functions to help answer these kinds of questions. group_by sets a column (or columns) by which you want to perform a summarizing function on, then summarize creates a new variable by performing a variety of summary/transformative functions on an existing column.
First, we can use summarize on its own, without any grouping, to get a single summary about the data frame. For example, if we want to know the mean body mass:
# calculate the mean body mass for the whole data frame
summarize(penguins, mean_body_mass_g = mean(flipper_length_mm))
## # A tibble: 1 × 1
## mean_body_mass_g
## <dbl>
## 1 NAIf the result is NA, be sure to include the ‘na.rm = T’ argument to tell the function to ‘remove NAs’ before calculating:
## # A tibble: 1 × 1
##   mean_flipper_length_mm
##                    <dbl>
## 1                   201.
But if we want to know the mean flipper length across certain grouping variables, such as sex, we want to combine summarize with group_by first.
penguins %>%
  group_by(species) %>%
  summarize(mean_flipper_length_mm = mean(flipper_length_mm, na.rm = T))
## # A tibble: 3 × 2
## species mean_flipper_length_mm
## <fct> <dbl>
## 1 Adelie 190.
## 2 Chinstrap 196.
## 3 Gentoo 217.These functions are powerful. We can group by multiple columns at once AND summarize can create several new summary variables within the same summarize function, just by separating arguments by a comma in both cases. For instance, we can group by species and sex, and generate two summary variables of mean and standard deviation flipper length:
penguins %>%
  group_by(species,sex) %>%
  summarize(mean_flipper_length_mm = mean(flipper_length_mm, na.rm = T),
            sd_flipper_length_mm = sd(flipper_length_mm, na.rm = T))
## `summarise()` has grouped output by 'species'. You can override using the
## `.groups` argument.## # A tibble: 8 × 4
## # Groups: species [3]
## species sex mean_flipper_length_mm sd_flipper_length_mm
## <fct> <fct> <dbl> <dbl>
## 1 Adelie female 188. 5.60
## 2 Adelie male 192. 6.60
## 3 Adelie <NA> 186. 6.11
## 4 Chinstrap female 192. 5.75
## 5 Chinstrap male 200. 5.98
## 6 Gentoo female 213. 3.90
## 7 Gentoo male 222. 5.67
## 8 Gentoo <NA> 216. 1.263.4.3 Check in challenge
Use summarize to calculate the mean and standard deviation for each year-sex group combination. Before calculating those summaries, filter out the observations where there is no data for penguin sex. Name this new summary table ‘summary_challenge’. What is the mean and standard deviation of the body mass for male penguins in 2008?
Check your answer
summary_challenge <- penguins %>%
  filter(!is.na(sex)) %>%
  group_by(year,sex) %>%
  summarize(mean_body_mass_g = mean(body_mass_g, na.rm = T),
            sd_body_mass_g = sd(body_mass_g, na.rm = T))
## `summarise()` has grouped output by 'year'. You can override using the
## `.groups` argument.## # A tibble: 6 × 4
## # Groups: year [3]
## year sex mean_body_mass_g sd_body_mass_g
## <int> <fct> <dbl> <dbl>
## 1 2007 female 3821. 610.
## 2 2007 male 4479. 833.
## 3 2008 female 3888. 680.
## 4 2008 male 4632. 722.
## 5 2009 female 3874. 709.
## 6 2009 male 4521. 813.